
What Is PS2 BIOS?
PS2 BIOS stands for PlayStation 2 Basic Input/Output System. It is the built-in system software found on every physical PlayStation 2 console. When you turn on a PS2, the BIOS starts first and prepares the console before the system menu or a game loads.
The BIOS initializes key hardware, including the CPU, graphics, audio, controllers, memory cards, and disc drive. It also handles basic system settings, including language, date, time, and display options.
Different PS2 consoles have different BIOS versions based on their region and model. You may find BIOS files for regions such as USA, Europe, Japan, and China, with each file usually linked to a specific SCPH model.
Emulators such as PCSX2 and AetherSX2 recreate the PS2 hardware in software, but they still need the BIOS to provide the original system software. If the BIOS is missing, corrupted, or not detected correctly, the emulator may show a “BIOS not found” error or fail to boot games.
What Does the PS2 BIOS Actually Do?
The PS2 BIOS works behind the scenes whenever you start a PlayStation 2. It prepares the console’s hardware, loads basic system settings, checks connected devices, and gets everything ready before a game or disc starts.
Here are the main things the PS2 BIOS handles:
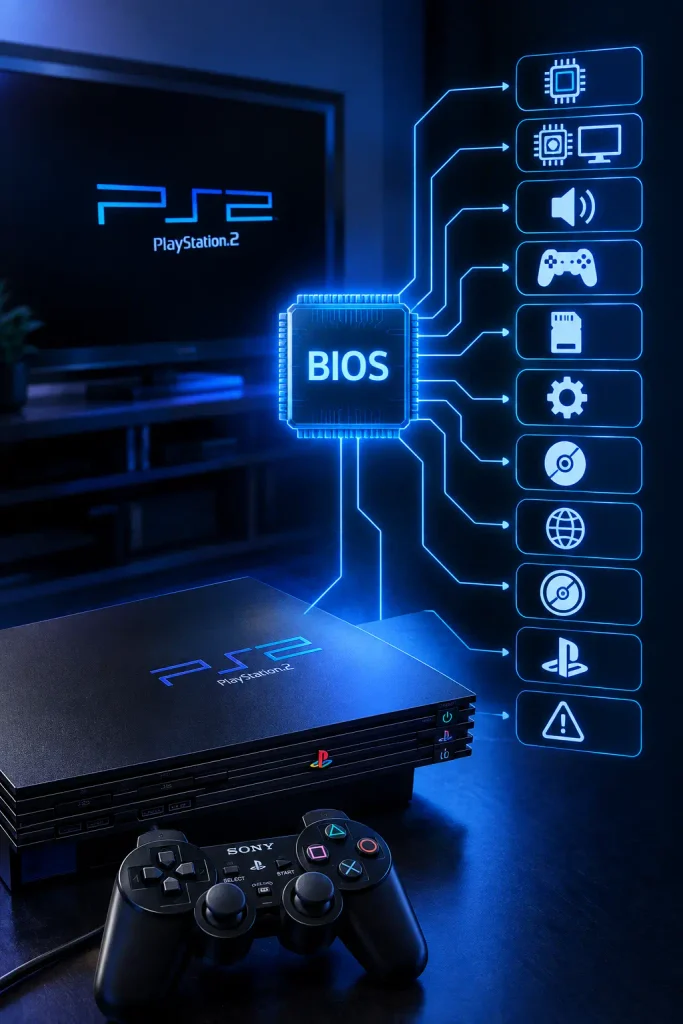
In an emulator, these functions are reproduced together with the virtual PS2 hardware. This is why a compatible BIOS is an important part of setting up PCSX2, AetherSX2, and other PS2 emulators.
PS2 BIOS Download (All Regions)
PS2 BIOS files are available in different regional versions because the PlayStation 2 was released in different parts of the world. The main BIOS regions include USA, Japan, Europe, Australia, and China, and each one is associated with a different video standard and console model.
|
Region |
Common Standard |
Common BIOS Identifier |
Download All |
|
USA / North America |
NTSC-U |
SCPH-30001, SCPH-39001 |
|
|
Japan |
NTSC-J |
SCPH-10000, SCPH-18000 |
|
|
Europe / Australia |
PAL |
SCPH-50003, SCPH-75004 |
|
|
China |
NTSC-C |
Regional SCPH variants |
|
|
Other Asia-Pacific regions |
NTSC-J / PAL |
Depends on the console model |
What is the difference between NTSC vs. PAL?
NTSC and PAL are video standards used in different regions. NTSC was mainly used in countries such as the USA and Japan, while PAL was common in Europe and Australia.
The two standards can differ in refresh rate, video timing, and supported resolutions. These differences are mainly related to how games and the original PS2 hardware were designed for each region.
For emulation, the BIOS region can affect how the system starts and handles certain region-specific games and settings.
Does the BIOS Region Need to Match the Game?
It is generally best to use a BIOS from the same region as your game when possible. For example, a USA game can be paired with a USA BIOS, while a European game can use a PAL BIOS.
However, emulators such as PCSX2 can support games from different regions, so a BIOS and game do not always have to be from the exact same region. If you experience boot or compatibility issues, checking the BIOS and game regions is a useful first step.
PS2 BIOS Versions and SCPH Model Numbers
PS2 BIOS files are connected to different console models and hardware revisions. One of the easiest ways to identify a PS2 model is its SCPH number, which is usually printed on the console itself or its original packaging.
What Does SCPH Mean?
SCPH is the model prefix used by Sony for PlayStation hardware. The number that follows it identifies a particular PS2 model or hardware revision. For example, SCPH-39001 and SCPH-50003 are different PS2 models released for different regions.
The SCPH number is useful when checking a BIOS because it can help you identify the console model, region, and related BIOS version. However, the SCPH number itself is not the BIOS version; they are two different pieces of information.
Common PS2 SCPH Models
Different regions had their own PS2 model numbers. Some commonly seen examples include:
| Region | Common SCPH Models |
| Japan | SCPH-10000, SCPH-18000 |
| USA / North America | SCPH-30001, SCPH-39001, SCPH-70012 |
| Europe / PAL | SCPH-50003, SCPH-75004 |
| China / Asia | SCPH-70000 and other regional variants |
PS2 BIOS Versions vs. Hardware Revisions
A PS2 hardware revision refers to a change in the physical console, such as a different motherboard design or internal components. A BIOS version is the system software stored in the console’s firmware.
Sony released many PS2 revisions, so you may come across BIOS files associated with different SCPH models. For normal emulation, you usually do not need to understand every hardware revision. The important part is choosing a valid BIOS that your emulator can recognize.
Fat PS2 vs. Slim PS2
The original Fat PS2 models are larger and generally have different internal hardware from the later Slim PS2 models. Slim versions also changed the motherboard and other internal components.
These hardware changes can be associated with different SCPH numbers and BIOS versions. However, for emulators such as PCSX2 and AetherSX2, the Fat or Slim design of the original console is usually less important than having a valid BIOS from a compatible region and model.
PS2 BIOS File Format and Technical Details
PS2 BIOS files can appear in different formats depending on how they were dumped, saved, or packaged. Knowing the common file types makes it easier to identify the actual BIOS file and prepare it for use with an emulator.
PS2 BIOS File Format
The main PS2 BIOS file is commonly provided as a .BIN file. This file contains the BIOS data that an emulator such as PCSX2 can use to start the virtual PS2 system.
You may also come across MEC and .NVM files alongside a BIOS. These files can contain additional system or configuration data associated with a PS2 BIOS dump, but they are not the same as the main BIOS .BIN file.
How Large Is a PS2 BIOS File?
The size of a PS2 BIOS can vary depending on the BIOS dump and the files included with it. Instead of judging a BIOS only by its file size, check its file format, region, SCPH model, and integrity to make sure you are working with a valid dump.
What are ZIP and 7Z BIOS Archives?
PS2 BIOS files are often placed inside ZIP or 7Z archives to make them easier to package and transfer. The archive itself is not the BIOS; it simply contains the BIOS files.
Before adding the BIOS to an emulator, you will normally need to extract the archive and use the actual BIOS file inside it. Do not simply rename a ZIP or 7Z file to .BIN.
How to Recognize a Valid PS2 BIOS File?
A valid BIOS dump should have the correct file extension and recognizable information such as its region and SCPH model. It should also be complete and free from corruption.
When checking a BIOS file, look at these basic details:
- Region: Check whether it is from the USA, Japan, Europe, China, or another region.
- SCPH Model: The model number can help identify the original PS2 hardware associated with the BIOS.
- File Extension: The main BIOS file is commonly a .BIN file.
- File Integrity: A corrupted or incomplete BIOS may not be detected or may cause boot problems in an emulator.
These checks are usually enough for beginners to identify and prepare a PS2 BIOS without getting into unnecessary technical details.
PS2 BIOS vs. ISO vs. ROM
A BIOS is the system software of the PS2, while an ISO is a digital copy of a game disc. A ROM is a more general term commonly used for game files from other types of consoles.
| File Type | What It Is | Main Purpose |
| PS2 BIOS | System software from a PS2 console | Starts and initializes the emulated PS2 system |
| PS2 ISO | Digital image of a PS2 game disc | Contains the game data |
| ROM | Common term for dumped game software | Usually associated with cartridge-based consoles |
What is the difference between BIOS vs. ISO?
The easiest way to understand the difference is to think of the BIOS as the PS2’s system software and the ISO as the game disc data. The emulator uses the BIOS to recreate the PS2 system and loads the game data from an ISO.
Because they serve different purposes, having a game ISO does not replace the need for a BIOS in emulators that require one.
Do You Need Both a BIOS and an ISO?
For emulators such as PCSX2, you generally need both a compatible PS2 BIOS and your own legally obtained PS2 game dump to play games. The BIOS provides the system software, while the game file provides the actual game.
Why Are PS2 Games Usually Called ISOs Rather Than ROMs?
The term ROM is widely used for games dumped from cartridges and other systems, while PS2 games are based on CDs and DVDs. Their digital copies are therefore commonly referred to as disc images or ISOs.
You may still see people casually use the word “ROM” for PS2 games, but ISO is the more accurate term when referring to a digital image of a PS2 disc.
Which PS2 BIOS Should You Use?
The right PS2 BIOS mainly depends on your game region, emulator, and the BIOS files you have available. There is no single BIOS that is the best choice for every game. For most users, choosing a valid BIOS from the same region as the game is a simple place to start.
Choosing a BIOS Based on Your Game Region
| Game Region | BIOS Region to Consider |
| USA / North America | USA / NTSC-U |
| Japan | Japan / NTSC-J |
| Europe | Europe / PAL |
| Australia | Europe / PAL |
| China | China / NTSC-C |
For example, if you are playing a USA game, a USA BIOS is a straightforward choice. Similarly, Japanese games can be paired with a Japan BIOS, while European and Australian games can use a PAL BIOS.
Which BIOS Should Beginners Use?
If you are new to PS2 emulation, you do not need to worry about finding a specific “best” BIOS. Start with a valid BIOS that matches your region and is supported by your emulator. If the game runs correctly, there is usually no reason to keep changing the BIOS.
Older vs. Newer PS2 BIOS
A newer PS2 BIOS is not automatically better than an older one. Different BIOS versions are connected to different PS2 models and regions, so compatibility is more important than simply choosing the newest version.
Does a Higher SCPH Number Mean a Better BIOS?
No. A higher SCPH number does not mean that the BIOS is newer, faster, or better for emulation. SCPH numbers identify PS2 models and hardware revisions, so they should be used for identification rather than as a quality rating.
Can You Use Multiple PS2 BIOS Files?
Yes. Emulators such as PCSX2 can support multiple BIOS files, allowing you to select a different regional BIOS when needed. This can be useful if you play games from different regions.
In most cases, however, you can simply choose the BIOS that matches your game region and leave the emulator settings unchanged unless you experience a compatibility issue.
How to Get PS2 BIOS Legally?
A PS2 BIOS is copyrighted system software, so the safest approach is to dump the BIOS from a PlayStation 2 that you own rather than getting a copy from an unofficial download source. This gives you a BIOS taken directly from your own console and helps avoid using an unknown or modified file.
Dumping the BIOS From Your Own PS2
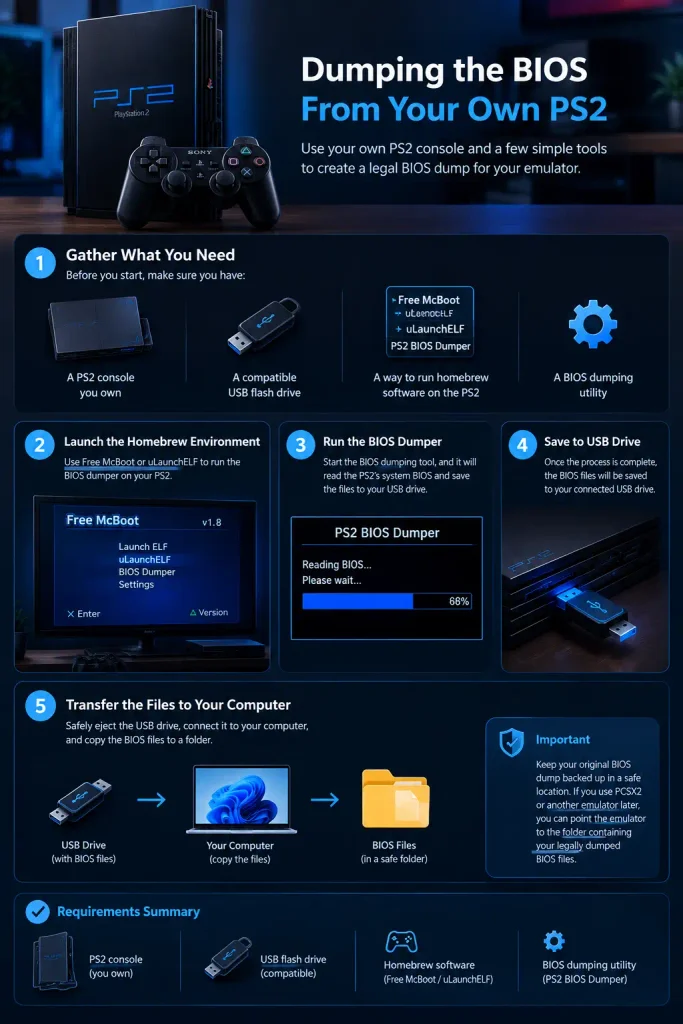
To create your own BIOS dump, you generally need a working PS2, a USB flash drive, and a BIOS dumping tool. Common homebrew tools used for this purpose include Free McBoot, uLaunchELF, and PS2 BIOS Dumper.
The exact process can vary depending on your PS2 model and the method you use. In general, the dumper runs on the PS2, reads the console’s BIOS, and saves the resulting files to a USB drive.
The basic requirements are:
- A PS2 console that you own
- A compatible USB flash drive
- A way to run homebrew software on the PS2
- A BIOS dumping utility
Free McBoot is a popular homebrew environment that can help launch tools on compatible PS2 consoles. uLaunchELF is a file manager commonly used to access files and launch applications, while a BIOS PS2 Dumper is designed specifically to extract the BIOS from the console.
Saving and Transferring the BIOS
After the dumping process finishes, the BIOS files are normally saved to the connected USB drive. You can then safely eject the drive, connect it to your computer, and copy the BIOS files to a folder for use with your emulator.
Keep your original BIOS dump backed up in a safe location. If you use PCSX2 or another emulator later, you can point the emulator to the folder containing your legally dumped BIOS files.
How to Verify a PS2 BIOS File?
Checking a PS2 BIOS file can help you make sure it is complete and has not been damaged or changed. This is especially useful when moving a BIOS between devices or troubleshooting an emulator that does not recognize the file.
What Is a BIOS Checksum?
A checksum or hash is a value generated from the contents of a file. If two BIOS files have the same hash, their contents match. If the hash is different, the files are not identical.
Common hash types include CRC32 and MD5. CRC32 is useful for quick integrity checks, while MD5 is commonly used when comparing a file against a known hash value.
How to Check a BIOS Hash?
You can calculate a file’s hash using built-in tools or third-party utilities, depending on your device.
- Windows: You can use PowerShell or a file hashing utility to calculate the BIOS hash.
- macOS: The Terminal can be used with built-in hashing commands.
- Android: File manager or checksum apps can calculate hashes for files stored on your device.
The important part is to compare the result with a trusted hash value for the exact BIOS dump you are checking. A different hash does not automatically mean the BIOS is bad; it may simply be a different BIOS version or model.
How to Tell if a BIOS File Is Corrupted?
A corrupted BIOS may fail to appear in the emulator, produce an error when selected, or cause the emulator to fail during startup. If you suspect corruption, check the file’s hash and make sure the file was transferred or extracted correctly.
For most users, you do not need to perform advanced checks. A valid BIOS file, a matching hash when one is available, and successful detection by your emulator are usually enough to confirm that the file is usable.
Which PS2 Emulators Use BIOS Files?
Not every PS2 emulator handles the BIOS in the same way. Some require a genuine PS2 BIOS to start the system, while others use different approaches and may not need a BIOS file at all.
The most well-known emulator that uses a PS2 BIOS is PCSX2. Other projects, including AetherSX2 and NetherSX2, also use PS2 BIOS files on supported Android devices.
| Emulator | Platform | BIOS Required? |
| PCSX2 | Windows, Linux, macOS | Yes |
| AetherSX2 | Android | Yes |
| NetherSX2 | Android | Yes |
| RetroArch | Multiple platforms | Depends on the core |
| ArmSX2 | Android | Yes |
| DamonPS2 | Android | Yes |
| Play! | Windows, macOS, Linux, Android, iOS, and others | No |
What is PCSX2?
PCSX2 is a popular open-source PS2 emulator for desktop computers. It requires a PS2 BIOS dump to initialize the emulated console. After installing PCSX2, you add your BIOS files to the appropriate BIOS directory and select one during setup.
PCSX2 is available on major desktop platforms, including Windows, Linux, and macOS. The exact BIOS folder and setup steps can vary by operating system.
What are AetherSX2 and NetherSX2?
AetherSX2 was designed for Android devices and uses a PS2 BIOS file to start the emulated system. You import your BIOS file through the emulator and then select it during configuration.
NetherSX2 is a community-developed continuation based on AetherSX2 and also uses a PS2 BIOS. Both are intended for Android devices, although performance can vary depending on the phone or tablet’s hardware.
Other PS2 Emulators
Other projects such as RetroArch, ArmSX2, DamonPS2, and Play! have different approaches to PS2 emulation. BIOS requirements can depend on the emulator, core, or version you are using.
For example, RetroArch uses individual emulator cores, so its BIOS requirements depend on the core. Play! is notable because it does not require a traditional PS2 BIOS file.
How to Download Bios PS2 in PCSX2?
Setting up a PS2 BIOS in PCSX2 is simple once you have a BIOS dump from your own PS2 console. The main steps are to install PCSX2, place the BIOS files in the correct folder, select the BIOS during setup, and then load your PS2 game.
The steps below are designed for beginners and follow the current PCSX2 setup process.
1. Download and Install PCSX2
First, download PCSX2 from the official website and install the version available for your operating system. PCSX2 currently supports Windows, Linux, and macOS.
After installation, open PCSX2. If this is your first time running the emulator, it will start the First Time Configuration wizard.
You will be asked to configure a few basic options, including the language, BIOS, and game directory. You can leave most settings at their default values during this first setup.
2. Locate the PCSX2 BIOS Folder
During the first-time setup, PCSX2 will display a BIOS Selection screen. You should see an option such as Open BIOS Folder.
Click this option to open the folder where PCSX2 looks for BIOS files. The current PCSX2 setup documentation specifically recommends using this button to open the correct BIOS directory rather than guessing the folder location.
Keep this folder open because you will need it in the next step.
3. Extract the BIOS Archive
If your legally dumped BIOS files are inside a ZIP or 7Z archive, extract the archive first.
Right-click the archive and choose the appropriate extraction option from your file manager. After extraction, you should have the actual BIOS files available rather than the compressed ZIP or 7Z file.
Do not simply rename a ZIP or 7Z archive to .BIN. PCSX2 needs to detect the actual BIOS image inside the archive.
4. Move the BIOS Files to the BIOS Folder
Copy your extracted BIOS files into the BIOS folder that PCSX2 opened for you.
You do not normally need to create another folder inside it. Place the BIOS files directly in the BIOS directory so PCSX2 can scan them.
Once the files have been copied, return to the PCSX2 setup window.
5. Refresh the BIOS List
On the BIOS selection screen, click Refresh List. PCSX2 will scan the BIOS directory and display the BIOS files it recognizes.
If your BIOS does not appear, check that:
The archive was extracted correctly.
The BIOS files are in the correct folder.
The files are not still inside a ZIP or 7Z archive.
The BIOS dump is complete and valid.
6. Select Your BIOS Region
Once PCSX2 detects the BIOS, you will see it in the BIOS list. Select the BIOS you want to use.
If you have BIOS files from different regions, you can choose the one that matches the region of the game you plan to play. For example, you might select a USA BIOS for a USA game or a PAL BIOS for a European game.
You can keep multiple BIOS files in the folder if you need them. PCSX2 allows you to select which detected BIOS to use.
7. Complete the PCSX2 Setup Wizard
After selecting your BIOS, continue through the setup wizard. You can leave the basic emulator settings at their default values for now.
PCSX2 may also ask you to select a folder containing your PS2 games. If you already have your own game dumps, choose the folder where they are stored. You can also add the game directory later.
When the setup is complete, finish the wizard and open the main PCSX2 window.
8. Verify That PCSX2 Detects the BIOS
Before trying to start a game, it is a good idea to check that PCSX2 has recognized your BIOS correctly.
Open Settings go to BIOS in PCSX2. The BIOS settings page shows the BIOS directory and the BIOS files that PCSX2 has detected.
If your BIOS is listed and selected, the basic BIOS setup is complete.
If PCSX2 does not detect it, go back to the BIOS folder and check the file location and integrity before trying again.
9. Load a PS2 Game ISO
Once the BIOS is working, you can load your own PS2 game dump.
For an ISO file, open PCSX2 and choose System and then Start File, then locate your PS2 ISO and select it. PCSX2 also allows you to add a game directory so your games can appear in its game list.
If everything is configured correctly, PCSX2 will start the game using the selected BIOS.
How to Set Up PS2 BIOS on Android?
Playing PS2 games on an Android phone or tablet requires a compatible PS2 emulator, a legally obtained BIOS dump, and your own game files. The exact menus can vary between emulator versions, but the basic process is similar.
AetherSX2 and NetherSX2 BIOS Setup
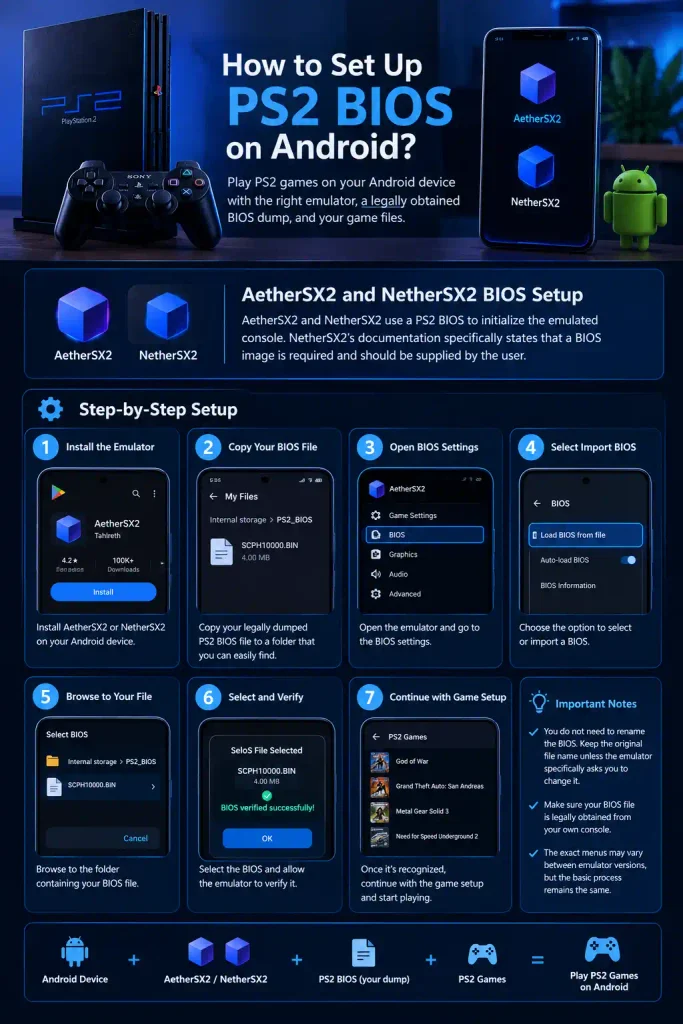
AetherSX2 and NetherSX2 use a PS2 BIOS to initialize the emulated console. NetherSX2’s current documentation specifically states that a BIOS image is required and should be supplied by the user.
The basic setup is:
- Install the emulator on your Android device.
- Copy your legally dumped PS2 BIOS file to a folder that you can easily find.
- Open the emulator’s BIOS settings.
- Choose the option to select or import a BIOS.
- Browse to the folder containing your BIOS file.
- Select the BIOS and allow the emulator to verify it.
- Once it is recognized, continue with the game setup.
You do not need to rename the BIOS simply because you are using Android. Keep the original file name unless the emulator specifically asks you to change it.
PS2 BIOS on Other Platforms
PS2 BIOS support is not limited to Android. The setup is generally similar on desktop systems, but the emulator you choose determines whether an external BIOS is required.
Windows
On Windows, PCSX2 is one of the main options and requires a PS2 BIOS dump. Its setup wizard provides an Open BIOS Folder option where you can place the BIOS before refreshing the BIOS list.
macOS
PCSX2 is also available for macOS. The BIOS is added through the same general setup process, although the location of application data can differ from Windows.
Linux
PCSX2 supports Linux, and its BIOS setup follows the same basic idea: provide the emulator with your BIOS dump and select it during configuration. The exact file location can depend on how PCSX2 was installed.
iOS
PS2 emulation on iOS depends on the emulator being used. Not every emulator handles BIOS files in the same way, so check the documentation for the specific emulator rather than assuming that a PCSX2-style BIOS folder will work.
RetroArch
RetroArch itself is a frontend rather than a single PS2 emulator. Its BIOS requirements depend on the core being used. If you use a PS2 core that requires a BIOS, the BIOS must be placed in the location expected by that core.
An Important Exception: Play!
Play! works differently from PCSX2, AetherSX2, and NetherSX2. Its developers state that it uses a built-in high-level emulation BIOS, so an external PS2 BIOS file is not required or supported.
Common PS2 BIOS Problems and How to Fix Them
Most BIOS problems come down to a few simple causes: the emulator cannot find the file, the file is invalid, the wrong folder is being used, or the game itself has a separate compatibility problem.
| Problem | Possible Cause | What to Try |
| BIOS not found | BIOS is in the wrong location | Open the emulator’s BIOS settings and select the correct folder |
| BIOS is not detected by PCSX2 | File is missing, corrupted, or in the wrong folder | Use Open BIOS Folder, copy the BIOS there, then refresh the list |
| BIOS file is not showing | Archive was not extracted, or the file is unsupported | Extract the archive and check the actual BIOS file |
| Black screen when starting a game | Game, BIOS, or emulator configuration issue | Test another game and return advanced settings to default |
| Game will not boot | Damaged game dump or compatibility issue | Check the game file and emulator compatibility |
| Region-related problem | BIOS and game use different regions | Try a BIOS from the game’s region |
| Corrupted BIOS file | Incomplete or damaged dump | Recheck the file or create a fresh BIOS dump |
| BIOS disappears after restarting | Storage permissions or incorrect folder | Select a stable folder and give the emulator the required access |
| Controller not detected | Controller or input mapping issue | Reconnect it and check the emulator’s controller settings |
| Audio or video problems | Graphics or audio configuration | Return to default settings and test again |
| Red screen or unusual BIOS screen | BIOS/game or emulator compatibility issue | Test another BIOS or game and check the emulator’s compatibility information |
| BIOS loads but game still does not work | The problem may be with the game rather than the BIOS | Test another game before replacing the BIOS |
How to Fix PS2 BIOS Compatibility Problems?
If your PS2 game is not booting correctly, the BIOS may be one possible cause, but it is not always the problem. The game file, emulator settings, graphics renderer, or hardware can also affect compatibility.
Use the following checks to find the actual cause instead of changing several settings at once.
Check Your BIOS Region
Start by checking whether your BIOS belongs to the correct region. Common regions include USA (NTSC-U), Japan (NTSC-J), Europe/Australia (PAL), and China (NTSC-C).
Using a BIOS from the same region as your game is a good first step when troubleshooting. However, a region difference does not automatically mean the game will fail to run.
Check Your Game Region
Check the region of the game itself. You can usually identify it from the game’s serial, disc information, or the source of your own game dump.
If a game is having boot or compatibility problems, testing it with a BIOS from the same region can help determine whether the region is involved.
Try Another BIOS Version
If the BIOS is detected correctly but a particular game still has problems, you can test another valid BIOS from your own PS2 collection.
This does not mean that a newer or higher SCPH number is automatically better. Different BIOS versions are associated with different PS2 models and regions, so compatibility can vary between specific games and emulator configurations.
Verify the BIOS File Integrity
A damaged or incomplete BIOS dump can cause detection or boot problems. If the emulator does not recognize the file, first make sure it is the actual BIOS file rather than a ZIP or 7Z archive.
For a more detailed check, compare the file’s checksum or hash with a trusted reference for the exact BIOS version. Keep in mind that different BIOS versions can have different hashes without either file being corrupted.
Check the BIOS Folder
Make sure the emulator is looking in the folder where your BIOS file is actually stored.
In PCSX2, you can use the Open BIOS Folder option to find the correct location rather than guessing the folder path. After placing the BIOS there, refresh the BIOS list and check whether it appears.
Reset Emulator Configuration
If your BIOS was working before but problems started after changing several settings, return the emulator to its default configuration and test the game again.
This is especially useful when you have changed graphics, speed, or advanced emulation settings. If the game works with default settings, change one option at a time to identify the setting causing the problem.
Check the Game ISO
A working BIOS does not guarantee that every game file will boot. A damaged or incomplete game dump can cause black screens, crashes, freezes, or missing content.
If the BIOS is detected normally, test another game from your own collection. If other games work, the problem may be with the specific game file rather than the BIOS.
Use the PCSX2 Compatibility List
When a particular game continues to cause problems, check the PCSX2 compatibility list before changing advanced settings.
The list contains tested games and can help you determine whether a problem is already known and whether a specific configuration or game fix is recommended. PCSX2 currently has thousands of tested titles in its compatibility database.
PS2 BIOS Performance and Configuration Tips
The BIOS itself normally is not the setting you change to make PS2 emulation faster. Most performance differences come from the emulator configuration, CPU, GPU, graphics renderer, internal resolution, and game-specific settings.
If your BIOS is detected and games boot normally, focus on emulator settings rather than repeatedly changing BIOS files.
Does the BIOS Affect Emulator Performance?
A BIOS can affect compatibility in some situations, but it is not normally a performance booster.
A valid BIOS mainly provides the PS2 system software required by the emulator. If the game already runs correctly, switching to another BIOS should not be your first choice for increasing FPS.
BIOS vs Emulator Settings
It is important to separate the BIOS from emulator settings.
BIOS: Provides the original PS2 system software needed by emulators such as PCSX2.
Emulator settings: Control how the computer or phone recreates PS2 hardware, including graphics rendering, resolution, timing, and other options.
If your game is slow, changing the BIOS is usually not the first thing to try. Check the emulator settings and your hardware instead.
Choosing the Right Renderer
The graphics renderer determines how PCSX2 processes and displays the game’s graphics.
For most users, Automatic is a good starting point because PCSX2 can select a suitable graphics API based on the system. The official documentation recommends Automatic when you are unsure.
If you experience graphical glitches, crashes, or unusual performance, you can test another supported renderer and compare the results.
Vulkan vs Direct3D vs OpenGL
PCSX2 supports several graphics APIs, including Vulkan, Direct3D, and OpenGL, with availability depending on the operating system and hardware.
There is no single renderer that is ideal for every computer. PCSX2’s current documentation notes that Vulkan is fully featured and generally fast, while OpenGL has different performance characteristics depending on the GPU. Direct3D 12 is also supported on compatible systems, and PCSX2’s recent releases have made it a preferred option on many Windows systems.
If Automatic works well, there is usually no reason to change it.
Internal Resolution Scaling
Internal resolution controls how clearly the game is rendered compared with the original PS2 resolution.
Increasing it can make games look much sharper on modern displays, but it also increases GPU workload. If you notice slowdowns, stuttering, or unstable performance after increasing the resolution, lower it again.
For a weaker computer, starting with a lower internal resolution is usually more practical. A stronger GPU can handle higher resolutions more comfortably. PCSX2’s own hardware guidance notes that higher internal resolutions require more GPU performance.
Speedhacks
Speedhacks can change how the emulator handles certain parts of PS2 hardware to improve performance, but they can also create compatibility problems in some games.
For example, PCSX2 documents speedhack options such as MTVU and notes that certain games can be incompatible with particular speedhack settings.
For this reason, do not enable random speedhacks just because a game is slow. Start with the default settings and only change a speedhack when there is a specific reason to do so.
Fast Boot vs Full Boot
Fast Boot skips the normal PS2 BIOS startup sequence and goes directly to the game. This makes starting a game quicker.
If you want to see the original PS2 startup animation, or if Fast Boot appears to be causing a particular issue, you can disable it in PCSX2’s BIOS settings. PCSX2 enables Fast Boot by default.
Fast Boot does not make your BIOS better or faster; it simply skips the visible startup process.
Game-Specific Compatibility Settings
Some games may need different settings even when most of your PS2 library works perfectly.
Instead of changing the global configuration, PCSX2 allows you to create game-specific properties. This lets you adjust settings for one title without affecting the rest of your games.
This is useful when a particular game has graphical glitches, freezing, timing problems, or other compatibility issues while other games work normally.
When to Return to Default Settings?
If your changes make the game worse, return to the default configuration before trying anything else.
A simple troubleshooting order is:
- Make sure the BIOS is detected.
- Confirm the BIOS file is valid.
- Check that the game file works.
- Start with Automatic/default graphics settings.
- Test the game.
- Change one setting at a time if necessary.
- Use game-specific settings for problems affecting only one title.
This approach makes it much easier to identify the real cause of a problem instead of changing several settings and not knowing which one fixed or caused the issue.
Do You Need to Update Your PS2 BIOS?
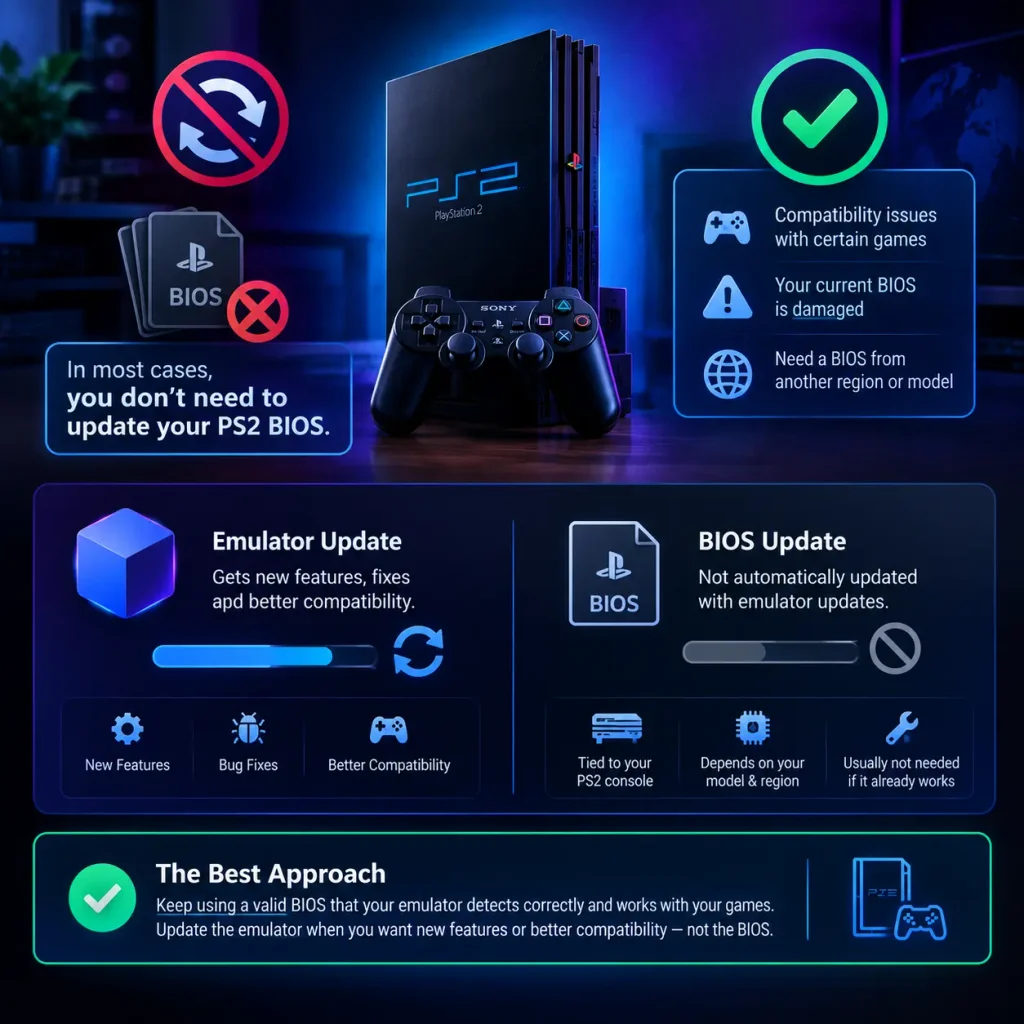
In most cases, you do not need to update your PS2 BIOS just because a newer BIOS version exists. The BIOS is tied to the original PS2 console and its hardware, region, and model. Unlike an emulator, it is not something you normally update through regular software updates.
It is also important to understand the difference between a PS2 BIOS update and an emulator update. When PCSX2 or another emulator receives an update, the emulator itself gets new features, fixes, and compatibility improvements. Your BIOS does not automatically change when you update the emulator.
You may consider using a different BIOS version if you are experiencing a specific compatibility problem, your current BIOS is damaged, or you need a BIOS from another region or PS2 model. If your games are already working correctly, there is usually no reason to replace the BIOS simply for the sake of using a newer version.
A newer BIOS is not automatically better. A higher SCPH number does not mean better performance or compatibility. Different BIOS files represent different PS2 models and regions, so the most suitable choice depends on your emulator, game, and original console.
For most users, the best approach is simple: keep using a valid BIOS that your emulator detects correctly and that works with your games. Focus on updating the emulator itself when you want compatibility improvements or new features, rather than repeatedly changing the BIOS.
PS2 BIOS Compatibility Testing
After installing a PS2 BIOS, it is a good idea to test it before spending time changing graphics or performance settings. A BIOS that is correctly detected should allow the emulator to start the PS2 system and boot compatible games normally.
Start with the BIOS itself, then test a game, controller, memory card, and basic audio and graphics. This helps you identify whether a problem comes from the BIOS or from another part of the emulator setup.
1. Check whether the BIOS is detected
Open your emulator’s BIOS settings and check whether your BIOS appears in the available list. In PCSX2, the BIOS should appear after you place it in the correct BIOS folder and refresh the list.
If the BIOS is not detected, check the file location, make sure the archive has been extracted, and verify that the BIOS file is not damaged.
2. Test the PS2 startup
If your emulator allows a full BIOS boot, start the PS2 without immediately launching a game. The PS2 system screen should appear normally.
You can also use Fast Boot if you only want to launch games quickly, but a full boot can be useful when troubleshooting because it confirms that the emulator can start the PS2 system software correctly.
3. Test a game
Load a PS2 game from your own legally created game dump and check whether it reaches the title screen and starts normally.
If one game fails while other games work, the BIOS may not be the problem. The individual game file or its compatibility with the emulator could be responsible.
4. Test controller input
Once a game starts, check the basic controls. Test the D-pad, analog sticks, face buttons, shoulder buttons, Start, and Select.
If the game runs but the controller does not respond correctly, check the emulator’s input configuration rather than changing the BIOS.
5. Test memory card functions
Create or connect a virtual memory card and test whether the game can recognize it and save data.
If saving does not work, check the emulator’s memory-card configuration and storage permissions. A memory-card problem does not normally mean that your BIOS is faulty.
6. Check graphics and audio
Play the game for a few minutes and look for major problems such as missing graphics, severe flickering, crashes, distorted audio, or unusual slowdowns.
If the BIOS loads and the game starts but graphics or audio are incorrect, check the emulator’s renderer and other graphics settings before replacing the BIOS.
7. Test more than one game
For a more reliable compatibility check, test two or three different games rather than using only one title. Ideally, choose games that use different types of graphics, audio, and gameplay features.
If several games boot and basic functions such as controls and saving work, your BIOS and basic emulator setup are likely functioning correctly. If only one game has problems, investigate that game’s compatibility separately.
Quick PS2 BIOS Compatibility Checklist
If these basic checks pass, there is usually no need to keep changing your BIOS. You can move on to configuring graphics and performance settings for your particular hardware.
Frequently Asked Questions (FAQs)
Final Thoughts
A PS2 BIOS is an essential part of PS2 emulation because it provides the system software that emulators such as PCSX2 and compatible Android emulators need to start and run PlayStation 2 games.
Choosing a BIOS is usually straightforward. Use a valid BIOS from your own PS2, preferably from the same region as the games you want to play. Make sure the file is intact, place it in the correct emulator folder, and confirm that the emulator detects it before changing other settings.
If a game does not work, remember that the BIOS is not always the cause. Game compatibility, the game dump, emulator settings, graphics renderer, and your computer or Android device can all affect how a PS2 game runs.
Once the emulator detects your BIOS and your games boot correctly, you can focus on improving graphics and performance through the emulator’s settings. With the right BIOS and a properly configured emulator, you can recreate the PS2 experience on modern hardware while keeping your setup organized and reliable.