
How to Update PS2 BIOS for PCSX2 (Step by Step)
You cannot update a PS2 BIOS the way you update an app, because Sony never released BIOS updates you could install. In PCSX2, “updating” means adding or switching to a different BIOS dump. You copy the new BIOS files into PCSX2’s BIOS folder, click Refresh List, and select the new version. It takes about two minutes.
If your real problem is an outdated emulator, you need to update PCSX2 itself instead. This guide covers both, plus the Android steps, the real console question, and what to do when the new BIOS does not show up.
Can you update a PS2 BIOS?
No, not in the normal sense. The PS2 BIOS is fixed firmware that came with the console, and there is no official update file. When people say “update PS2 BIOS,” they usually mean one of three things.
| What you want | What it really means | Where to look |
| A newer or different BIOS | Add another BIOS dump and select it in PCSX2 | Steps below |
| A newer emulator | Update PCSX2, not the BIOS | “How do you update PCSX2 itself?” |
| A repaired console | Fix or replace a damaged BIOS chip | “Can you update the BIOS on a real PS2?” |
When should you change your PS2 BIOS?
Change your BIOS when a game fails to boot, shows odd audio or video, or when you want a different region for your games. Do not change it just because a newer version exists. A higher version number does not always mean better compatibility.
These are the common reasons:
| Problem | What to try |
| “BIOS not found” or “invalid BIOS” message | Add a valid BIOS dump and select it |
| A game crashes at startup | Try a BIOS from the same region as the game |
| Wrong language or odd timing | Match the BIOS region to the game |
| Japanese or PAL games act strangely | Add a Japan or Europe BIOS |
| Games worked before a PCSX2 update | Check emulator settings and paths first |
If a game broke right after you updated PCSX2, the BIOS is rarely the cause. Check the BIOS folder path and your graphics settings before you replace anything.
What do you need before you start?
You need a BIOS dump from a PS2 you own, a computer with PCSX2 installed, and a minute to back up your current BIOS folder. PCSX2 is built to use a BIOS dumped from your own console. The BIOS is Sony’s copyrighted software, so we do not link to downloads. If you do not have one yet, follow our guide to dump your own PS2 BIOS. It uses a USB drive and a free tool called bios drain.
A dump often contains several files, not one. Common extras include files for system settings and memory-card data. Keep them together and do not rename them. File names vary by console model, so do not worry if yours look different from someone else’s.
In an emulator, these functions are reproduced together with the virtual PS2 hardware. This is why a compatible BIOS is an important part of setting up PCSX2, AetherSX2, and other PS2 emulators.
How do you update PS2 BIOS in PCSX2?
Copy the new BIOS files into the PCSX2 BIOS folder, refresh the list, select the new BIOS, and test it with a game.
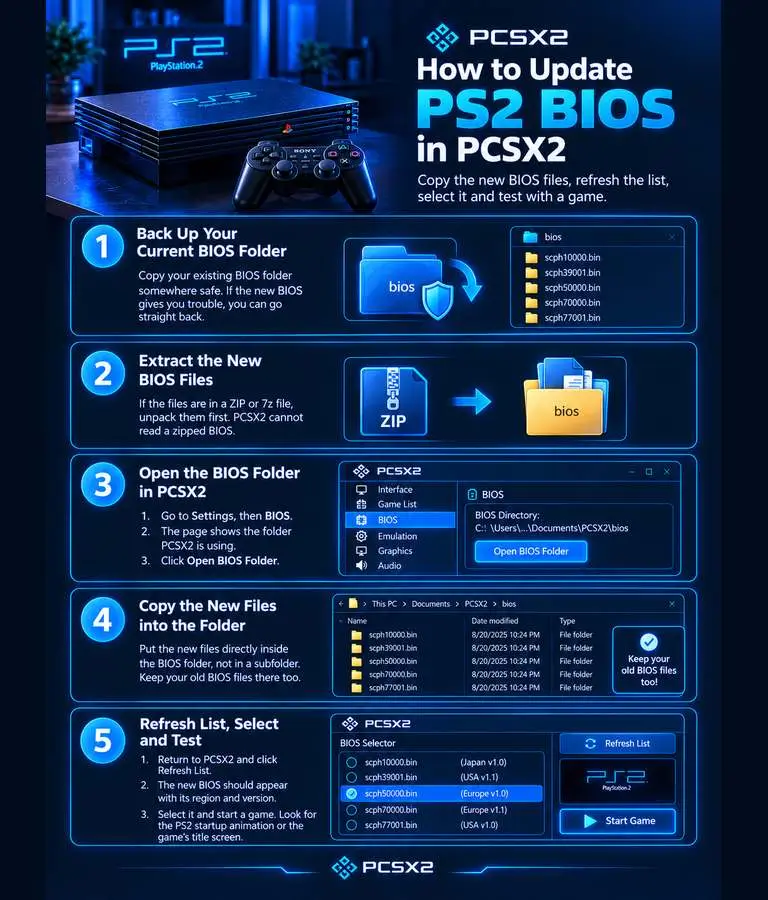
For the first test, turn off Fast Boot. If the full startup animation plays, PCSX2 is running the whole BIOS. After that, you can turn Fast Boot back on for everyday play.
Here are the usual default folders if you want to find them by hand:
| Platform | Default BIOS folder |
| Windows (installed) | Documents\PCSX2\bios |
| macOS | ~/Library/Application Support/PCSX2/bios |
| Linux | ~/.config/PCSX2/bios |
The Open BIOS Folder button is the safest way, since it always opens the right place. For a full walkthrough on every platform, see our guide to install PS2 BIOS files.
How do you check which BIOS version PCSX2 is using?
Open Settings, then BIOS. The selected entry shows its region and version, for example “USA v02.00” followed by a date. That label tells you which BIOS PCSX2 will load next time you start a game.
If you added a file but the version looks wrong, you probably selected the old entry. Click the new one and save.
How do you update PCSX2 itself?
Open PCSX2’s Help menu and use its update option, or download the newest build from the official PCSX2 website and install it. Updating the emulator often does more for compatibility than changing the BIOS.
Here is what to know:
After updating, open Settings, then BIOS, and confirm the folder path is still correct. A new install can point to a different, empty folder, which causes a sudden “BIOS not found” error even though your files are fine.
Which BIOS should you choose?
Choose a BIOS that matches your game region. A USA BIOS for American games, a Japan BIOS for Japanese games, and a Europe BIOS for PAL games. Our guide on which PS2 BIOS to use explains every model in detail.
If you only keep one, a USA BIOS is a common choice because it works with the widest range of games. Models such as SCPH-70012 are often recommended for that reason.
Some tips on choosing:
How do you update the PS2 BIOS on Android?
Move the BIOS files to your phone, extract them, then import them through the emulator’s BIOS settings. The steps are very similar to the desktop version.
AetherSX2 is no longer updated by its developer. NetherSX2 and other newer apps use a similar BIOS screen. If your app finds nothing, check that it has permission to read your storage. Menu names vary between apps.
Can you update the BIOS on a real PS2?
No. There is no official BIOS update for a PS2 console, and you cannot flash a new version from a disc or memory card. If a console has a damaged BIOS chip, the repair is a hardware job, not an update.
That repair means removing the chip and replacing or reprogramming it with special tools. It is risky and best left to a specialist. If your PS2 will not start and you suspect the chip, read our guide to corrupted BIOS symptoms to learn the signs before you pay for repairs.
Also note that running a dump tool on a modded PS2 is not an update. It only copies the BIOS out so you can use it in an emulator.
How do you go back to your old BIOS?
Open Settings, then BIOS, and select the old entry from the list. Nothing else is needed, because the old files are still in the folder. Save, then start a game to confirm it loads.
If you removed the old files by mistake, copy them back from the backup you made in step one. This is why the backup is worth the extra minute.
What is the quick checklist?
Run through this list each time you change a BIOS:
Why is PCSX2 not showing my new BIOS?
The most common causes are a zipped file, a wrong folder, or a list that was not refreshed. These fixes solve most cases.
| Problem | Likely Cause | Fix |
| New BIOS missing from the list | Files still zipped | Extract them, then copy the raw files |
| New BIOS missing from the list | Files in a subfolder | Move them straight into the bios folder |
| List looks the same | Not refreshed | Click Refresh List |
| “BIOS not found” after a PCSX2 update | New install uses a different folder | Check the path in Settings, then BIOS |
| Version number looks wrong | Old entry still selected, or an incomplete dump | Select the new entry or dump again |
| Startup animation plays, game will not load | Region or version mismatch | Try a BIOS from the game’s region |
| Game still crashes | Not a BIOS problem | Check the ISO and graphics settings |
If nothing helps, delete the new files and copy them in again. Interrupted copies are a surprisingly common cause. If the problem continues, your dump may be damaged, and dumping again fixes it.